If you use MaxCDN to speed-up your WordPress blog/site, then you may face one issue during server migration. The issue is – IP-address of new server will not get updated in MaxCDN automatically. You need to do this manually like below:
Steps to Update IP Address on MaxCDN:
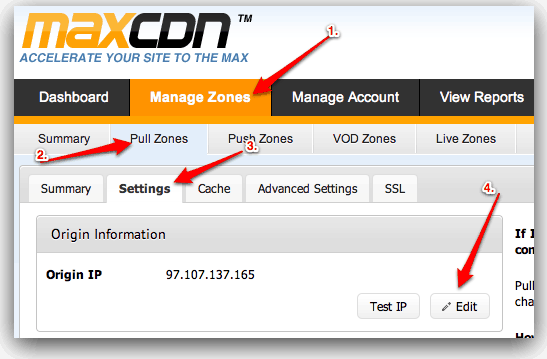
- Login to MaxCDN account. Go to “Manage Zones”.
- Go to “Pull Zone” which you like to update.
- Then go to “Settings” tab.
- You will see a section titled “Origin Information”. That will contain IP address of your old server. Click the “Edit” button in that section. (see screenshot)

- Then enter new IP-address in “Origin IP” field and click the “Update” button. (see screenshot)

Why don’t MaxCDN update IP address manually?
Its common to perform some testing on a test server, and then use another server, a different one, for production site. So IP-address change is not something very uncommon.
MaxCDN uses IP address to serve content faster. But rather than automatically updating their cache, say daily, they keep it forever! While I like the manual option to “Update” IP address is settings area, which gives advance users some control, it would be better if MaxCDN combine this manual option with automated cache-update.
Smart Auto-Update: A smart solution would be to update IP-Address when “Origin Server” starts returning HTTP 404-error. When there will be too many 404-errors, it may mean the server has been moved. Of course, CDN misconfiguration or origin server-downtime can also result in 404-error but “Smart” programs supposed too handle such cases as well!
Recommended Reading: How to Setup MaxCDN on WordPress using W3 Total Cache Plugin