
In this step by step tutorial I am going to create a Supernova text effect using smudge tool and blending options.
Steps to create Supernova text effect :
- Create a file of 300 x 300 pixel.
- Fill it with black color.
- Make sure the default foreground and background colors are white and black.
- Select smudge tool.
- From file menu choose Window –> brush.

- On layer 1 you can add some noise if you want.
- Now create a new layer select it (Layer 2).
- Here this could be a difficult part, so first select smudge tool, click the mouse in the center then hold shift key and drag the mouse upwards finally you will get this kind of effect.
- (Note: first click then hold shift key and pull it up)

- Now go on repeating the above step until you get this.

- Now the same thing downwards.

- Select outer glow from the blending option.

- Change outer glow 1) color to #ae02c2 and 2)opacity to 100%

- Create a text layer and write your text on it.

- Now copy the layer style, to do so hold Alt key and drag the fx and drop it into the text layer(Devilsworkshop).

- Create a vector mask.

- Now select the gradient tool and fill it downwards.

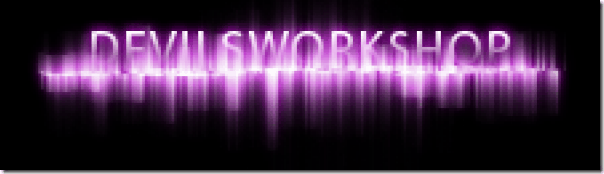
- Final output looks like shown in the below image, you can also change the text later however we have used blending options.

You can add lens flare to it and change the font family to make it look better.
Do drop in your comments.
One Comment
nice technique huzaifa…:)