
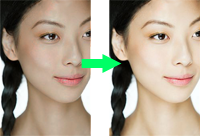
In my previous Photoshop articles I made a tutorial on How to Remove Certain Part of an image and How to Look Younger using Soften Skin Effect, It was liked by many of our readers and through a feedback I was asked to create a tutorial on how to create a fair skin effect. Read the simple tutorial for fair skin effect in few easy steps.

Step : 1 – Take the image duplicate it(Cntrl J)and move it to the right for comparison.

Step : 2 – Select Quick selection tool and make sure Add to Selection in option bar is selected. Select the area you want to make it fair.

Step : 3 –After you made a selection Go to Image menu > Adjustment > Brightness/Contrast.

Step : 4 – The following pop up appears adjust brightness and contrast as per your requirement.

And you are done with it, look at the image below.

Did you like this tutorial? If you have any questions feel free to ask them through your valuable comments.
2 Comments
This isn’t a tut, but you can call it a PS tut by definition.
But, the world has changed. Grow up.