
You must have seen many animated .GIF images but had not idea on how to go about creating them. Here I am going to tell step by step how to go about creating an image with simple GIF animation.
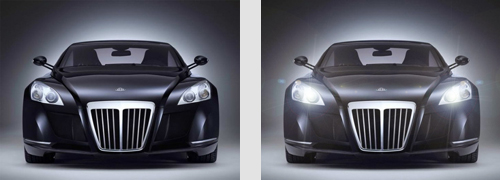
In this tutorial we are going to use Blink Light Effect using Lens Flare Filter. As in the above image you can see it the original on the left hand side and make it look like the headlights were turned on.
Original Image

- Lets first make a duplicate layer of the image. Right Click on the layer and you can see the Duplicate Layer option in the below palate. Or just Press Ctrl+J key. See the image below.

- After duplicating the layer just go to Filter > Render > Lens Flare

- Now we can see the Lens Flare palate box displayed on your screen.
- Set the Lens Flare on the car’s headlight.
- Set the Brightness value – 85%, keep on 105mm Prime. Click on “OK”.

- Now repeat this step with the left side headlight.
- Now we have created a light effect by using lends flare filter. Check the image below.

- Now to add animation effect to it.
- We have two layers. One is normal image and another is with the light effect.
- Just go to Window > Animation. You can see Animation Frames Pallet display on your screen. (Check image below)

- Here we see the frame 1 in the Animation Frames Pallet.

- Now to create the duplicate of frame 1.
- Just Click on this icon to Duplicate the frame.

- Select the first frame and go to the Layer Pallet and then hide the layer. See the red highlighted box in the image

- Now select the second frame and go to Layer Pallet
- Keep the selection on the above image layer. (Check the image below)

- We have two frames and now to set the time to display the frame.
- Set the Time Value – 0.5sec. for both images. (Check the image below)

- We can preview the Animation here. Just click the Play Button below the Frames Pallet.

- Save the file in GIF Animated format.
- Go to File > Save for Web & Devices (Alt+Shift_Ctrl+S). Click on it.

- Save for Web & Devices is displayed on the screen.

- Now select the GIF format here like shown in the image below. Select GIF and Save the file.

Resultant image

Hope you find this tutorial useful. If you know any easier methods or tips, do discuss them in your comments.
2 Comments
nicely explained umesh , please come up with more and especially some logo designing tuts
Oh my God, so simple like that….two tumb for you.