Many people new to the WordPress community seem to have a common question – “How to create a WordPress Widget?”. Today I’m going to help you to code a simple widget with which you can display the Recent Comments with the Author Gravatar in Sidebar.
WP has given the feature to extend the default functionality of widgets. We can achieve this by extending the WP_Widget class.
when we extend the WP_Widget Class we need not repeat the code and thus the features of this class are available to our class say “rt_comments_widget” (custom class).
First we will create the skeleton of our widgets in functions.php :
<?php
class rt_comments_widget extends WP_Widget {

    function rt_comments_widget() {
    //Constructor
    }

    function widget($args, $instance) {
    // prints the widget
    }

    function update($new_instance, $old_instance) {
    //save the widget
    }

    function form($instance) {
    //widgetform in backend
    }
}

add_action( 'widgets_init', create_function( '', 'return register_widget("rt_comments_widget");' ) );
?>
As seen in the code above, we have created a class rt_comments_widget, which inherits the properties and methods of the WP_Widget class (extends).
Further, we have called four functions –
- The rt_comments_widget function which acts as a constructor
- The widget function which prints the widget
- The update function which saves the widget
- The form function which handles the widget form in the backend.
- The function add_action is used to register the widget.
Let’s fill up our widget.
Step 1:
<?php
function rt_comments_widget() {
    $widget_ops = array( 'classname' => 'widget_rt_comments_widget', 'description' => __( 'Widget for Show Recent Comment with Author Gravatar in Sidebar.' ) );
    $this->WP_Widget( 'rt-comments-widget', __( 'RT: Comments with Gravatar' ), $widget_ops );
} // end of function rt_comments_widget()
?>
In the code above, we now describe the rt_comments_widget where in you can give a class to your widget to style your widget, give a description to your custom widget and give your widget a title which is showed in the widget area of the admin panel.
In our example “RT: Comments with gravatar” is our widget title.
Step 2:
<?php
function widget( $args, $instance ) {
extract( $args, EXTR_SKIP );
$title = empty( $instance['title'] ) ? 'Recent Comments' : apply_filters( 'widget_title', $instance['title'] );
$gravatar = !empty( $instance['gravatar'] ) ? $instance['gravatar'] : 64;
$count = !empty( $instance['count'] ) ? $instance['count'] : 3;
$alternative = !empty( $instance['alternative'] ) ? $instance['alternative'] : '';
echo $before_widget;
if ( $title )
echo $before_title . $title . $after_title;
global $wpdb;
$total_comments = $wpdb->get_results( "SELECT comment_date_gmt,comment_content, comment_author, comment_ID, comment_post_ID, comment_author_email, comment_date_gmt FROM " . $wpdb->comments . " WHERE comment_approved = '1' and comment_type != 'trackback' ORDER BY comment_date_gmt DESC" );
$comment_total = count($total_comments);
echo '<ul>';
for ( $comments = 0; $comments < $count; $comments++ ) {
if( $alternative == "on" ) {
$right_grav = $comments % 2 ? 'style="float:right"' : '' ;
$left_readmore = $comments % 2 ? 'style="float:left"' : '' ;
} else {
$right_grav = '';
$left_readmore = '';
}
echo '<li>';
echo "<div class='comment-container clearfix'>";
echo "<div class='author-vcard' $right_grav title='".$total_comments[$comments]->comment_author."'>";
echo get_avatar( $total_comments[$comments]->comment_author_email, $gravatar, $default='<path_to_url>' );
echo "</div>";
echo "<div class='comment-section'>";
echo '<div class="comment-date">';
echo '<a title="'. mysql2date( 'F j, Y - g:ia', $total_comments[$comments]->comment_date_gmt) .'" href="'. get_permalink($total_comments[$comments]->comment_post_ID) . '#comment-' . $total_comments[$comments]->comment_ID . '">';
echo mysql2date( 'F j, Y - g:ia', $total_comments[$comments]->comment_date_gmt);
echo '</a>';
echo '</div>';
echo "<div class='author-comment'>";
$str = wp_html_excerpt ( $total_comments[$comments]->comment_content,65 );
if( strlen( $str ) >= 65 ) {
echo $str.'...';
} else {
echo $str;
}
echo "</div>";
echo '<div class="sidebar-readmore" '.$left_readmore.' >';
echo '<a title="Reply" href="'. get_permalink($total_comments[$comments]->comment_post_ID) . '#comment-' . $total_comments[$comments]->comment_ID . '">';
echo 'Reply →';
echo '</a>';
echo '</div>';
echo '</div>'; //end of .comment-section
echo '</div>'; //end of .comment-container
echo '</li>';
}
echo '</ul>';
echo $after_widget;
} // end of function widget()
?>
Now we describe the widget function. In our example above, I fetched the date of the posted comment, author comments, author Gravatar, and reply to that comment from the database.
Here are the code snippets in the widget function:
- date:
<?php mysql2date( 'F j, Y - g:ia', $total_comments[$comments]->comment_date_gmt ); ?>
- author gravatar:
<?php get_avatar( $total_comments[$comments]->comment_author_email, $gravatar, $default='<path_to_url>' ); ?>
- author comment:
<?php $total_comments[$comments]->comment_content; ?>
( With Word Count '65' ) - reply link:
<?php echo '<a title="Reply" href="'. get_permalink( $total_comments[$comments]->comment_post_ID ) . '#comment-' . $total_comments[$comments]->comment_ID . '">Reply →</a>'; ?>
Step 3:
<?php
function update($new_instance, $old_instance) {
    global $wpdb;
    $total_comments = $wpdb->get_results("SELECT comment_date_gmt,comment_content, comment_author, comment_ID, comment_post_ID, comment_author_email, comment_date_gmt FROM " . $wpdb->comments . " WHERE comment_approved = '1' and comment_type != 'trackback' ORDER BY comment_date_gmt DESC" );
    $comment_total = count($total_comments);
    $instance = $old_instance;
    $instance['title'] = strip_tags($new_instance['title']);
    $instance['gravatar'] = strip_tags($new_instance['gravatar']);
    $instance['count'] = strip_tags($new_instance['count']) > $comment_total ? $comment_total : strip_tags($new_instance['count']);
    $instance['alternative'] = strip_tags($new_instance['alternative']);
    return $instance;
} // end of function update()
?>
With the help of code in the update function you can save your widget or update your data which is changed in admin panel.
Step 4:
<?php
function form( $instance ) {
    $title = isset( $instance['title'] ) ? ( $instance['title'] ) : '';
    $gravatar = !empty( $instance['gravatar'] ) ? $instance['gravatar'] : 64;
    $count = !empty( $instance['count'] ) ? $instance['count'] : 3;
    $alternative = !empty( $instance['alternative'] ) ? $instance['alternative'] : ''; ?>
    <p>
        <label for="<?php echo $this->get_field_id( 'title' ); ?>">Title: </label>
        <input class="widefat" id="<?php echo $this->get_field_id( 'title' ); ?>" name="<?php echo $this->get_field_name( 'title' ); ?>" type="text" value="<?php echo esc_attr( $title ); ?>" />
    </p>

    <p>
        <label for="<?php echo $this->get_field_id( 'gravatar' ); ?>">Gravatar Size: </label>
        <select id="<?php echo $this->get_field_id( 'gravatar' ); ?>" name="<?php echo $this->get_field_name( 'gravatar' ); ?>" style="float: right;width: 100px;">
            <option value="32" <?php selected( '32', $gravatar ); ?>>32x32</option>
            <option value="40" <?php selected( '40', $gravatar ); ?>>40x40</option>
            <option value="48" <?php selected( '48', $gravatar ); ?>>48x48</option>
            <option value="56" <?php selected( '56', $gravatar ); ?>>56x56</option>
            <option value="64" <?php selected( '64', $gravatar ); ?>>64x64</option>
            <option value="72" <?php selected( '72', $gravatar ); ?>>72x72</option>
        </select>
    </p>

    <p>
        <label for="<?php echo $this->get_field_id( 'count' ); ?>">Show Comments: </label>
        <input class="widefat show-comments" id="<?php echo $this->get_field_id( 'count' ); ?>" name="<?php echo $this->get_field_name( 'count' ); ?>" type="text" value="<?php echo $count; ?>" />
    </p><?php
        global $wpdb;
        $total_comments = $wpdb->get_results("SELECT comment_date_gmt,comment_content, comment_author, comment_ID, comment_post_ID, comment_author_email, comment_date_gmt FROM " . $wpdb->comments . " WHERE comment_approved = '1' and comment_type != 'trackback' ORDER BY comment_date_gmt DESC" );
        $comment_total = count($total_comments);
        echo "<div style='color: #444444;font-size: 11px;padding: 0 0 12px;'>You have total '" . $comment_total . "' comments to display</div>"; ?>
    <p>
        <label for="<?php echo $this->get_field_id( 'alternative' ); ?>">Show Alternate Comments: </label>
        <input name="<?php echo $this->get_field_name( 'alternative' ); ?>" type="hidden" value="off" />
        <input class="alternate" id="<?php echo $this->get_field_id( 'alternative' ); ?>" value="on" name="<?php echo $this->get_field_name( 'alternative' ); ?>" type="checkbox" <?php echo checked( 'on', $alternative ); ?> />
    </p>

    <script type="text/javascript">
        jQuery( '.show-comments' ).keyup(function () {
            this.value = this.value.replace(/[^0-9.]/g,'' );
        });
    </script>
    <?php
} // end of function form()
?>
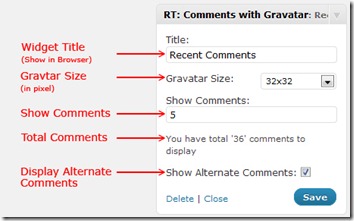
With the form function you can develop widgetform in the back end(admin panel) such as – entering a widget title, showing Gravatar size in the dropdown list, choosing the number of comments shown in sidebar and showing alternate comments. (refer 2nd screnshot below)
The simple javascript (jQuery) at the end of the code above is to validate your form field.
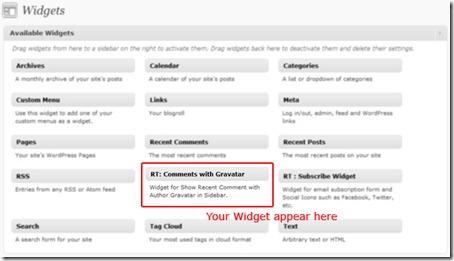
Your widget will now be appear in Admin Panel > Appearance > Widgets > Available Widgets
Here is the screenshot of your widget in the back end:
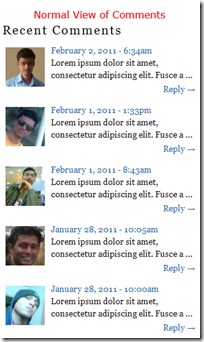
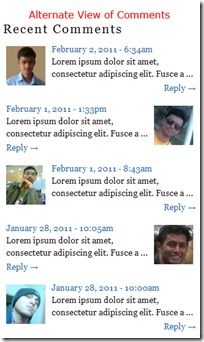
Here is the Final Screenshot of your widget: Normal View and Alternate View
Hope with the help of this widget you can easily show your “Recent Comments with Gravatar” in Sidebar. Do drop in your opinions and comments below 🙂


13 Comments
Nice post Manish keep up the good work n keep sharing interesting WordPress stuff with us:)
Thanks Huzaifa for your comment and suggession, I will try my best. 🙂
Hey great post!
Two questions –
> Which files do I exactly need to edit and which new files I need to create and drop (and where)? with the above code.
> Will you be converting the above code into a plugin that I can just install and get the whole functionality? A lot of wp blogs do that – explain the working and then give a fully functional plugin for newbies like me 🙂
Hey Kapil, I have provided complete code of widget in the bottom of Post, just copy that whole code and put in your function.php, this should work.
thanks for your great suggession, I would look forword too. 🙂
Recently I have seen this recent comments column on many blogs and was just wondering how this was possible, I was just thinking that this was because of a module and thought that it is possible only by enabling that module, but now I have got a alternative for that. Thanks for sharing this information…
I just used on my blog thonghuu.com
Thank you so much!
Where do I put that full code?
Hi Ryounosuke,
You need to put that full code in functions.php file in theme folder.
Let me know if it works or not.
Thanks for this great piece of code, but i have one issue, it doesn’t display a default gravatar if the commentator doesn’t have one. Just a blank space.
If it could display at least the default gravatar logo would be nice.
Any chance you can give me some insights on how to do it?
Cheers
Hi Alex,
For default “Mystery Man” gravatar we don’t need to pass the default parameter in the get_avatar() function.
So search for “get_avatar” in the code and just remove the default variable from the function, after that your code will look like this:
echo get_avatar( $total_comments[$comments]->comment_author_email, $gravatar );
That should do the trick. Try and let me know. 🙂
Thanks,
Thanks Manish! works great!
Just for curiosity in the “default” parameter i can put a url for an image in ?
Thanks again for your help-
Glad to know that my code worked for you.
To add custom gravatar image, just put the Image url in the last parameter of the get_avatar() function.
After putting the image URL, your code will look like this,
get_avatar( $total_comments[$comments]->comment_author_email, $gravatar, $default='http://example.com/path-to-image/gravatar.jpg' );Let me know if you have any doubt.