 Internet today is dominant with search engines, with every search engine fighting hard to grab their share of market. But in this fight, there is one search engine that stands apart-Wolfram Alpha.
Wolfram Alpha, which was launched last year in May, has quietly created a niche for itself by providing calculable knowledge available to everyone.
In an attempt to let users use the computational knowledge of Wolfram Alpha on their site, it has recently come up with Widget Builder, which lets users create widgets easily. These widgets can then be used on blogs or websites or shared on various social networking platforms.
The widgets are built on top of Wolfram Alpha queries and anyone can create them without any programming knowledge.
In this tutorial we will see how to create a widget from scratch. We’ll create a widget to convert one currency to other.
How to create the widget
- To create widgets you need to have an account with Wolfram Alpha. If you don’t already have an account create one here.
- Once you have signed in, you’ll be taken to My Widgets page, where you can create a new widget and also view your existing widgets. This page also displays a chart that shows the number of people who have used the widget created by you. (to boost your ego :P).
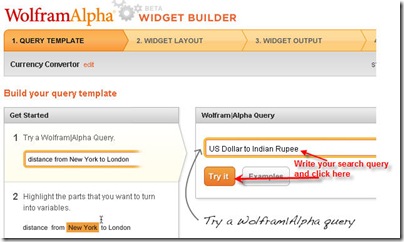
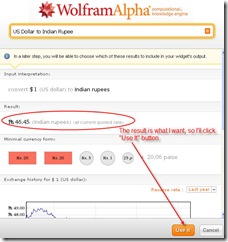
- When you click on Build Widget, you are taken to Query Template page. Here you write a search query as you would have done in a normal search engine. I queried for “US Dollar to Indian Rupee”. Now click on “Try it” button to see the result of your search query and if it is what you want then click “Use It”. If not, then modify your search query.
- In the next step you’ll be asked to highlight the elements of your search query that you want to use as variable. I want US Dollar and Indian Rupee to act as variable so I’ll highlight those. This means that US Dollar and Indian Rupee are variables and can be replaced with any other currency in the final widget. So our widget will act as a currency converter for all currencies.
- Now you have to specify the label name and component type. Label name is what will appear before the variable field in the widget. Using component type you define whether you want to keep the variable field as “input field” or a “check box” or a “pop-up menu”. This might sound confusing now, but once we are done with the complete process, it will be clear.
- The next step involves customizing the look and feel of your widget.
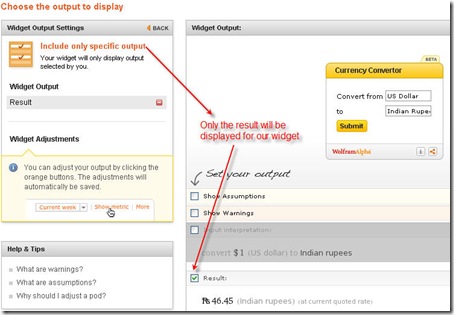
- Now you have to decide the output you want to display. If you have used Wolfram Alpha before, you would have notice that unlike other search engines, it gives a detailed result for your query, which includes Interpretation, Assumptions, Result and other useful information. So in this step you decide whether you want to display all the outputs or some specific output. For our widget, I want only the result to be displayed.
- In the next step you decide how you want the output to appear- as a pop up, or embedded below the widget. After that just enter the name, category, tags and description for your widget and hit Publish button. You are done. 😀
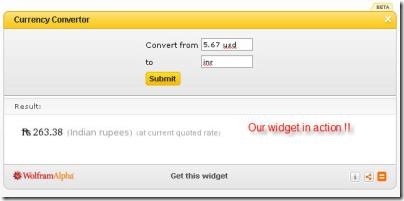
Your widget will get published in the Widgets Gallery under a Creative Commons License. You can embed the widget on your blog or share it with others. You can see the widget created in this tutorial here.
Wolfram should be praised for making the entire process of creating widget so simple. Since this is still in beta stage, you can expect more modifications in the near future.
So go ahead and create your own widgets or modify the existing ones. But don’t forget to share the link of your widget with us :).
Do let us know if you found this tutorial useful. Will you use it to create widgets for your blog?


4 Comments
really helpful 🙂 🙂
Thanks Akshay 🙂
very clear and practical
very informative post. I have used wolfram few times, never know one can create widgets also .